Elasticsearchで動いてる全文検索機能をまるっとGroongaに置き換えてみる遊び
先日ConoHa presents - Groonga “How-To” Talksなるイベントが開催されていました。
当日私はGroongaの話が聞きたかったわけでもなく、Twitterのハッシュタグ #ボスケテ を眺めながら遅れてくる皆さんを助けに行く仕事をしていたのですが、主催者の須藤さん@ktouが「ブログ書いてください」とおっしゃっていたので、今こうして書いております。
イベントの様子
今日は、みなさん週の真ん中で、お忙しいところ、お集まりいただきまして、ありがとうございました!私とお写真とってくださいね♡ #groonga pic.twitter.com/cML4mNiD7L
— 美雲このは✿サイトリニューアル (@MikumoConoHa) 2014, 9月 3発表内容などは資料が上がっているのでtogetterから見ていただくと良いかと思います。あとは弊社のDBAが何か書きそうな気がします。
せっかくなのでGroongaのことを何か書こうと思いますが、いままでGroongaまったくさわったこと無くて、全文検索エンジンはElasticsearchをちょっと使ってたりしてる程度でした。
Elasticsearchはプロダクトで使ってるのですが、やってることの大半はGroongaで置き換え可能だし、たいした性能要件もないのでどっちでも良かったりもします。
(Elasticsearchは全文検索だけじゃなくて、moreLikeThisでコンテンツのレコメンドっぽいこともしてるので、そのへんは除く)
というわけで、Elasticsearchでやっている基本的な検索機能だけをGroongaに置き換えてみる遊びをしてみようと思います!
※昨日の夜ここまで書いた時点ではすぐに出来ると思ってた
※Groonga歴1日未満なので、いろいろと間違ったことしてるかもしれません
Groongaのインストール
CentOS 6に入れてみます。公式のドキュメントに書いてあるとおり、公式のyumリポジトリから入れます。
$ sudo rpm -ivh http://packages.groonga.org/centos/groonga-release-1.1.0-1.noarch.rpm
$ sudo yum install -y groonga
この3つが入りました。
- groonga-libs-4.0.5-1.el6.x86_64
- groonga-plugin-suggest-4.0.5-1.el6.x86_64
- groonga-4.0.5-1.el6.x86_64
サーバーとして使うなら別途サーバー用のモジュールも、とのことです。
- groonga-server-http (簡易HTTPサーバー)
- groonga-httpd (nginxを元にしたHTTPサーバー)
- groonga-server-gqtp (GQTPサーバー)
勉強会でも説明されていましたが、http以外にGQTPというプロトコルがあるそうです。軽くて速そうな雰囲気を感じるので両方とも入れときます。
(httpの2つはコンフリクトするのでどっちかだけ)
$ sudo yum install -y groonga-httpd groonga-server-gqtp
起動と停止
httpd
$ sudo service groonga-httpd start
Starting groonga-httpd:                                    [  OK  ]
$ sudo service groonga-httpd stop
Shutting down groonga-httpd: [[-2,1409765053.20239,0.000134706497192383,"",[["","",0]]],false]
$ sudo service groonga-httpd stop
Shutting down groonga-httpd: curl: (7) couldn't connect to host
nginx: [error] open() "/var/run/groonga/groonga-httpd.pid" failed (2: No such file or directory)
(なんか停止の出力が怪しいけど停止している模様)
GQTP
$ sudo service groonga-server-gqtp start
Starting groonga-server-gqtp:
                                                           [  OK  ]
$ sudo service groonga-server-gqtp stop
Shutting down groonga-server-gqtp: [[0,1409765111.08915,0.000676631927490234],true]
                                                           [  OK  ]
データベース、テーブルの作成
公式のドキュメントにはチュートリアルとかありますが(時間がないので)すっ飛ばして実際に使うデータベース、テーブル、インデックスを作ります。
元となるElasticsearchでの定義はこのような感じ(長い)
インデックスの設定(analyzerの定義とか)もあるのですがさらに長いので割愛。
{
  "contents" : {
    "default" : {
      "_all" : {
        "analyzer" : "kuromoji_analyzer"
      },
      "_id" : {
        "path" : "contents_id"
      },
      "_timestamp" : {
        "enabled" : true,
        "path" : "update_date"
      },
      "_source" : {
        "enabled" : false
      },
      "properties" : {
        "bigram" : {
          "type" : "string",
          "analyzer" : "bigram_analyzer"
        },
        "city_detail" : {
          "type" : "string",
          "analyzer" : "kuromoji_analyzer"
        },
        "city_name" : {
          "type" : "string",
          "index" : "not_analyzed",
          "store" : true,
          "omit_norms" : true,
          "index_options" : "docs"
        },
        "create_date" : {
          "type" : "date",
          "store" : true,
          "format" : "dateOptionalTime",
          "include_in_all" : false
        },
        "description" : {
          "type" : "string",
          "store" : true,
          "analyzer" : "kuromoji_analyzer"
        },
        "genre_name" : {
          "type" : "string",
          "index" : "not_analyzed",
          "store" : true,
          "omit_norms" : true,
          "index_options" : "docs"
        },
        "id" : {
          "type" : "string",
          "index" : "no",
          "store" : true
        },
        "public_date" : {
          "type" : "date",
          "store" : true,
          "format" : "dateOptionalTime",
          "include_in_all" : false
        },
        "item1_description" : {
          "type" : "string",
          "analyzer" : "kuromoji_analyzer"
        },
        "item1_title" : {
          "type" : "string",
          "analyzer" : "kuromoji_analyzer"
        },
        "item2_description" : {
          "type" : "string",
          "analyzer" : "kuromoji_analyzer"
        },
        "item2_title" : {
          "type" : "string",
          "analyzer" : "kuromoji_analyzer"
        },
        "item3_description" : {
          "type" : "string",
          "analyzer" : "kuromoji_analyzer"
        },
        "item3_title" : {
          "type" : "string",
          "analyzer" : "kuromoji_analyzer"
        },
        "contents_id" : {
          "type" : "integer",
          "store" : true,
          "include_in_all" : false
        },
        "tags" : {
          "type" : "string",
          "index_name" : "tag",
          "index" : "not_analyzed",
          "store" : true,
          "omit_norms" : true,
          "index_options" : "docs"
        },
        "title" : {
          "type" : "string",
          "store" : true,
          "analyzer" : "kuromoji_analyzer"
        },
        "update_date" : {
          "type" : "date",
          "store" : true,
          "format" : "dateOptionalTime",
          "include_in_all" : false
        },
        "view" : {
          "type" : "integer",
          "store" : true,
          "include_in_all" : false
        }
      }
    }
  }
}
groongaコマンドで定義を操作します。
まずはこれで/tmp/db1にデータベースを作成して、contentsというテーブルを作成。
$ groonga -n /tmp/db1
> table_create --name contents --flags TABLE_HASH_KEY --key_type Int32
[[0,1409768798.63255,0.00557899475097656],true]
> select --table contents
[[0,1409768805.20054,0.000310420989990234],[[[0],[["_id","UInt32"],["_key","Int32"]]]]]
テーブル作成時に主キーを定義すると、_idと_keyというカラムができるようです。_idはGroongaが割り当てるIDとのことで、Elasticsearchでいうと_uidみたいなものっぽいです。
ユーザー定義の主キーは_keyで、これがElasticsearchでいう_idの役割ですね。
次にGroongaのデータ型を参照しつつカラムを追加します。
> column_create --table contents --name id --type ShortText
> column_create --table contents --name title --type ShortText
> column_create --table contents --name description --type Text
> column_create --table contents --name genre_name --type ShortText
> column_create --table contents --name city_name --type ShortText
> column_create --table contents --name city_detail --type ShortText
> column_create --table contents --name item1_title --type ShortText
> column_create --table contents --name item1_description --type Text
> column_create --table contents --name item2_title --type ShortText
> column_create --table contents --name item2_description --type Text
> column_create --table contents --name item3_title --type ShortText
> column_create --table contents --name item3_description --type Text
> column_create --table contents --name create_date --type Time
> column_create --table contents --name update_date --type Time
> column_create --table contents --name public_date --type Time
> column_create --table contents --name view --type UInt32
> column_create --table contents --name tags --flags COLUMN_VECTOR --type ShortText
> select --table contents
[[0,1409770485.62954,0.000128030776977539],[[[0],[["_id","UInt32"],["_key","Int32"],["city_detail","ShortText"],["city_name","ShortText"],["create_date","Time"],["description","Text"],["genre_name","ShortText"],["id","ShortText"],["item1_description","Text"],["item1_title","ShortText"],["item2_description","Text"],["item2_title","ShortText"],["item3_description","Text"],["item3_title","ShortText"],["public_date","Time"],["tags","ShortText"],["title","ShortText"],["update_date","Time"],["view","UInt32"]]]]]
最後のtagsには配列を入れたいので--flags COLUMN_VECTORとなっています。
select --table contentsすると、できあがったぽい定義らしきものが出てきました。
データ投入
JSONでデータを投入できるようです。ファイルを用意して流しこむだけ。
(ということはElasticsearchにクエリ投げてそのまま流しこめるかとか思ったのですが、そもそもElasticsearch側ではanalyze後の情報しか保持しないようにしてたのでダメでした)
というわけで、元のデータからJSONを生成してロードします。
$ groonga /tmp/db1 < /tmp/contents_list.json
[[0,1409814304.32408,0.0255069732666016],10]
load --table contentsコマンドから流し込まないといけないので、渡すファイルはこんな感じ。
(JSONファイルの先頭にloadコマンドを付け足す)
load --table contents
[
  {"_id": 1, "title": "xxxx"...},
  {"_id": 2, ...},
]
EC2のm3.mediumで1.3万件ほどのデータ(JSONで32MB)をロードして17.975secでした。
語彙表、インデックスカラムの作成
転置インデックスを別途定義したテーブルに入れて、そこにインデックスを作成する仕組みのようです。
このテーブルが語彙表と呼ばれます。
> table_create --name Terms --flags TABLE_PAT_KEY|KEY_NORMALIZE --key_type ShortText --default_tokenizer TokenMecab
[[0,1409815284.81158,0.00619673728942871],true]
トークナイザにTokenMecabを指定すればMecabで形態素解析できるっぽいです。
次にここにインデックスカラムを追加します。
> column_create --table Terms --name contents_title --flags COLUMN_INDEX|WITH_POSITION --type contents --source title
> column_create --table Terms --name contents_description --flags COLUMN_INDEX|WITH_POSITION --type contents --source description
> column_create --table Terms --name contents_genre_name --flags COLUMN_INDEX|WITH_POSITION --type contents --source genre_name
> column_create --table Terms --name contents_city_name --flags COLUMN_INDEX|WITH_POSITION --type contents --source city_name
> column_create --table Terms --name contents_city_detail --flags COLUMN_INDEX|WITH_POSITION --type contents --source city_detail
> column_create --table Terms --name contents_item1_title --flags COLUMN_INDEX|WITH_POSITION --type contents --source item1_title
> column_create --table Terms --name contents_item1_description --flags COLUMN_INDEX|WITH_POSITION --type contents --source item1_description
> column_create --table Terms --name contents_item2_title --flags COLUMN_INDEX|WITH_POSITION --type contents --source item2_title
> column_create --table Terms --name contents_item2_description --flags COLUMN_INDEX|WITH_POSITION --type contents --source item2_description
> column_create --table Terms --name contents_item3_title --flags COLUMN_INDEX|WITH_POSITION --type contents --source item3_title
> column_create --table Terms --name contents_item3_description --flags COLUMN_INDEX|WITH_POSITION --type contents --source item3_description
> column_create --table Terms --name contents_tags --flags COLUMN_INDEX|WITH_POSITION --type contents --source tags
データロード後の同じ環境で、この語彙表とインデックスカラムの作成が3.705secでした。ナニコレ速い!
検索してみる
> select --table contents --match_columns title --output_columns '_key, title' --query 初音ミク
[[0,1409819678.46057,0.00207829475402832],[[[1],[["_key","Int32"],["title","ShortText"]],[10348,"初音ミクならこの曲ランキング"]]]]
いちおう返ってきたけどおかしいです。もっとデータあるはずなのに。もしかして先頭一致しかしてない??
Termsテーブルがどうなってるかを見てみます。
> select --table Terms
[[0,1409819771.24752,6.00814819335938e-05],[[[107918],[["_id","UInt32"],["_key","ShortText"],["contents_city_detail","contents"],["contents_city_name","contents"],["contents_description","contents"],["contents_genre_name","contents"],["contents_item1_description","contents"],["contents_item1_title","contents"],["contents_item2_description","contents"],["contents_item2_title","contents"],["contents_item3_description","contents"],["contents_item3_title","contents"],["contents_tags","contents"],["contents_title","contents"]],[26289," ",2,0,0,0,0,0,0,0,0,0,0,0],[27557,"      izzie military coat",0,0,0,0,0,1,0,0,0,0,0,0],[27558,"    ray beams  ★【予約】swanlake×ray beams / 別注 チェック ト",0,0,0,0,0,1,0,0,0,0,0,0],[53295,"    ray beams  【予約】 canada goose / \"jasper\"",0,0,0,0,0,0,0,1,0,0,0,0],[78725,"    ray beams  【予約】 ray beams / メルトンショート ダッフルコート",0,0,0,0,0,0,0,0,0,1,0,0],[27559,"   すし久",0,0,0,0,0,1,0,0,0,0,0,0],[53296,"  8 garden",0,0,0,0,0,0,0,1,0,0,0,0],[78726,"  abill",0,0,0,0,0,0,0,0,0,1,0,0],[78727,"  centro (セントロ)",0,0,0,0,0,0,0,0,0,1,0,0],[53297,"  delica&bar es (デリカアンドバー エス)",0,0,0,0,0,0,0,1,0,0,0,0]]]]
なんだかおかしいというかこれは・・・トークナイズされてないような。
おもむろにyum search mecab groongaしたらgroonga-tokenizer-mecab.x86_64 : MeCab tokenizer for groongaというものが出てきました。これが必要な気がする・・・
こいつを入れて、いったん語彙表を再作成します。
$ sudo yum install -y groonga-tokenizer-mecab.x86_64
...
$ groonga /tmp/db1
> table_remove Terms
[[0,1409819977.47352,0.107458114624023],true]
語彙表とインデックスカラムの再作成は18.143secかかりました。さっきは何も動いてなかったようです。(なんか言ってよ・・・)
> select --table contents --match_columns title --output_columns '_key, title' --query 初音ミク
[[0,1409820132.57457,0.00243520736694336],[[[3],[["_key","Int32"],["title","ShortText"]],[873,"【初音ミク】【ボーカロイド】気持よくリズムに乗れるミクノ系サウンド"],[1067,"俺厳選 ビギナー向け初音ミク"],[10348,"初音ミクならこの曲ランキング"]]]]
やった!検索できました!
複数カラムの指定とスコアリングの調整もこんな感じでできました。
> select --table contents --match_columns 'title * 30 || description * 20 || genre_name * 10 || city_name * 10 || city_detail * 10 || item1_title || item1_description || item2_title || item2_description || item3_title || item3_description || tags * 10' --output_columns '_key, title' --query 初音ミク
[[0,1409820204.37755,0.0033717155456543],[[[10],[["_key","Int32"],["title","ShortText"]],[873,"【初音ミク】【ボーカロイド】気持よくリズムに乗れるミクノ系サウンド"],[1067,"俺厳選 ビギナー向け初音ミク"],[10348,"初音ミクならこの曲ランキング"],[761,"【心地よく聴ける】せつないGUMIうた"],[1280,"俺選!ボカロお気に入り名曲"],[11849,"巡音ルカならこの曲ランキング"],[1394,"会社のデスクに置けるフィギュア"],[6645,"11月度カラオケで歌われている歌"],[9512,"歓迎会で盛り上がるコスプレ衣装ランキング10"],[10547,"あなたは何処が好き?もしもの時の私の身近に★他国の方も好きらしい★好きだな日本コンビニ10選"]]]]
サーバーを動かす
groongaコマンドは直接データベースを触っていましたが、アプリケーションからネットワーク経由で触りたいのでサーバーを動かします。
(インストールと起動・停止は最初に確認済み)
groonga-httpd
/etc/sysconfig/groonga-httpdを見る限り、デフォルトだと10041ポートで動いていて、DBは/var/lib/groonga/db/dbのようです。(コメントアウトされてるけど)
$ cat /etc/sysconfig/groonga-httpd
# Default
#USER=groonga
#GROUP=groonga
#ADDRESS=127.0.0.1
#PORT=10041
#DATABASE=/var/lib/groonga/db/db
#LOG_PATH=/var/log/groonga/httpd/access.log
#QUERY_LOG_PATH=/var/log/groonga/httpd/access.log
#GRN_QUERY_EXPANDER_TSV_SYNONYMS_FILE=/usr/share/groonga/synonyms.tsv
TIMEOUT=3
GRN_JA_SKIP_SAME_VALUE_PUT=yes
面倒なので先ほど作成した/tmp/db1を上書きしてしまいます。
ファイルは・・・
$ ls /tmp/db1*
/tmp/db1          /tmp/db1.0000103  /tmp/db1.0000108  /tmp/db1.000010D  /tmp/db1.0000112    /tmp/db1.0000115    /tmp/db1.0000117.c  /tmp/db1.000011A    /tmp/db1.000011C.c  /tmp/db1.001
/tmp/db1.0000000  /tmp/db1.0000104  /tmp/db1.0000109  /tmp/db1.000010E  /tmp/db1.0000113    /tmp/db1.0000115.c  /tmp/db1.0000118    /tmp/db1.000011A.c  /tmp/db1.000011D
/tmp/db1.0000100  /tmp/db1.0000105  /tmp/db1.000010A  /tmp/db1.000010F  /tmp/db1.0000113.c  /tmp/db1.0000116    /tmp/db1.0000118.c  /tmp/db1.000011B    /tmp/db1.000011D.c
/tmp/db1.0000101  /tmp/db1.0000106  /tmp/db1.000010B  /tmp/db1.0000110  /tmp/db1.0000114    /tmp/db1.0000116.c  /tmp/db1.0000119    /tmp/db1.000011B.c  /tmp/db1.000011E
/tmp/db1.0000102  /tmp/db1.0000107  /tmp/db1.000010C  /tmp/db1.0000111  /tmp/db1.0000114.c  /tmp/db1.0000117    /tmp/db1.0000119.c  /tmp/db1.000011C    /tmp/db1.000011E.c
いっぱいありました。移動して動くのかどうか・・・
$ sudo service groonga-httpd stop
Shutting down groonga-httpd: [[-2,1409821811.97481,9.03606414794922e-05,"",[["","",0]]],false]
$ rename db1 db /tmp/db1*
$ sudo mv /tmp/db* /var/lib/groonga/db/
$ sudo chown -R groonga:groonga /var/lib/groonga/db/
$ sudo service groonga-httpd start
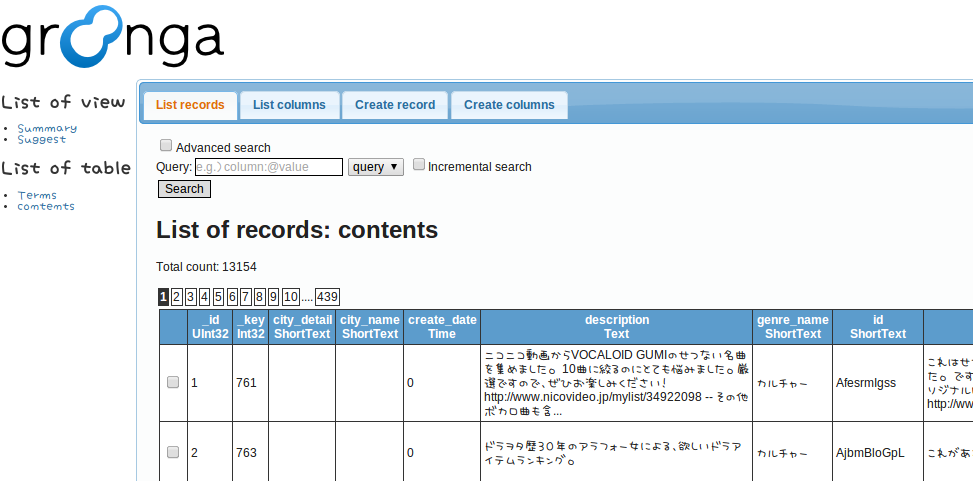
管理画面へアクセスしてみると(10041ポート)、データが見えているので動いていると思います!
Javaアプリケーションに組み込んでみたかった
イベントの中でPHPクライアントがいろいろあるという話を聞いていたので、普通にJavaクライアントもあるだろうと思ったんですが・・・
ふつうにHTTPクライアントを作るかGQTPプロトコル調べて作るかしないとですね。
ちからつきました。(一日じゃ無理だった)
アプリケーション側も対応させて、Elasticsearchでやってたファセット検索とドリルダウンとか、カラム内の数値を係数にしたスコアリングやってみたりとか、分散環境で動かしてスループット比較するぞとかまで妄想してました。(が、そんな簡単じゃなかったです!)
とはいえこのイベントがきっかけでちょっとだけグルンガーになれた気がします。主催してくれた須藤さんと弊社DBAには感謝です。あとこのはも。ありがとうございました!
ちなみに私もあんず派です。
